Email marketing generally makes up 20% to 30% of overall profit in direct-to-consumer businesses. You risk leaving a ton of money on the table if you don't add email marketing campaigns to your Shopify store.
Klaviyo is one of the best email and SMS marketing platforms available on the market. It's the perfect tool to help segment your audience, create automated email sequences, upsell and cross-sell, and much more.
But can you integrate your Klaviyo account with your Shopify store? Absolutely!
Shopify directly integrates with Klaviyo, allowing you to use data from Shopify within Klaviyo's email and SMS flows. You can create and trigger email flows based on events in Shopify, personalize your emails using customer-specific data, and much more. It's a powerful integration and will drive results in your email marketing campaigns.
In this article, we'll walk you through five easy steps to integrate Klaviyo with your Shopify store. Send us a message if you run into any issues as you follow along or if you have questions about connecting Klaviyo and Shopify!
Table of Contents
What is Klaviyo?
Klaviyo is a powerful growth marketing platform that helps online businesses provide dynamic, personalized customer experiences across owned communication channels, like email, SMS, and the web. It offers features including audience segmentation, real-time customer profiles, and marketing automation.
Klaviyo also provides analytics on the metrics that matter to your business. For example, the Performance Dashboard allows you to track visitor activity, refund requests, and recently ordered items, among other indicators. The platform also tracks how much revenue each campaign generates.
Klaviyo is simple to use and has an extensive library of stunning pre-built email templates you can choose from. Browse through their templates and then modify the colors, fonts, and images with their easy-to-use design editor to create the perfect email for your brand.
Finally, the real magic of Klaviyo is its robust marketing automation capabilities. With just a few clicks, you can set up personalized ecommerce marketing flows, such as welcome series, abandoned cart notifications, back-in-stock notifications, post-purchase emails, and many more. You can even set up flows based on predicted behaviors! And best of all, the emails are personalized to each customer's unique profile, purchases, and behavior, helping you build a strong relationship with your customers.
Key Benefits of Klaviyo
Here are some of the key benefits of Klaviyo:
- Unify customer data in one place: With Klaviyo's integrations, you can unify all your data to understand your audience better and deliver personalized experiences.
- Scale your omnichannel marketing: Increase your ROI and customer lifetime value using behavior-triggered email and SMS messages dynamically personalized for each customer.
- Real-time customer segmentation: Automatically segment your customers based on products purchased, browsing behavior, order value, and other data points.
- Immediately capture customer behavior: Add Klaviyo's javascript snippet on your site, and Klaviyo will instantly begin capturing customer browsing behavior.
- Rich data and reporting: Klaviyo's predictive analytics can forecast a customer's next order date, lifetime value, churn risk, and more. You'll also see benchmarks to compare how your campaigns stack up against similar companies.
Klaviyo Pricing
Klaviyo is incredibly cost-effective. They have options available for email, SMS, or both. There is also a free tier available if you want to try the platform.
- The free tier includes up to 250 contacts, 500 email sends, and email support.
- Pricing starts at $20/month after you hit 250 contacts.
SMS
- The free tier includes up to 50 SMS contacts, 150 SMS or 50 MMS sends, email support, and a toll-free number.
- Pricing starts at $5/month after you hit 50 SMS contacts.
Email + SMS
- The free tier includes the same limitations listed above.
- Pricing starts at $20/month for email after you hit 250 contacts and $5/month after you hit 50 SMS contacts.
Why Add Klaviyo to Shopify?
Integrating Klaviyo with your Shopify store is critical to harnessing Klaviyo's full power. Doing so allows you to bring your customer profiles, product information, and order data into Klaviyo to reach customers with personalized, targeted messaging. You can also track marketing campaign results in real-time to see how much revenue a campaign generates.
Steps to Add Klaviyo to Shopify
Follow these 5 easy steps to integrate your Klaviyo account with your Shopify store.
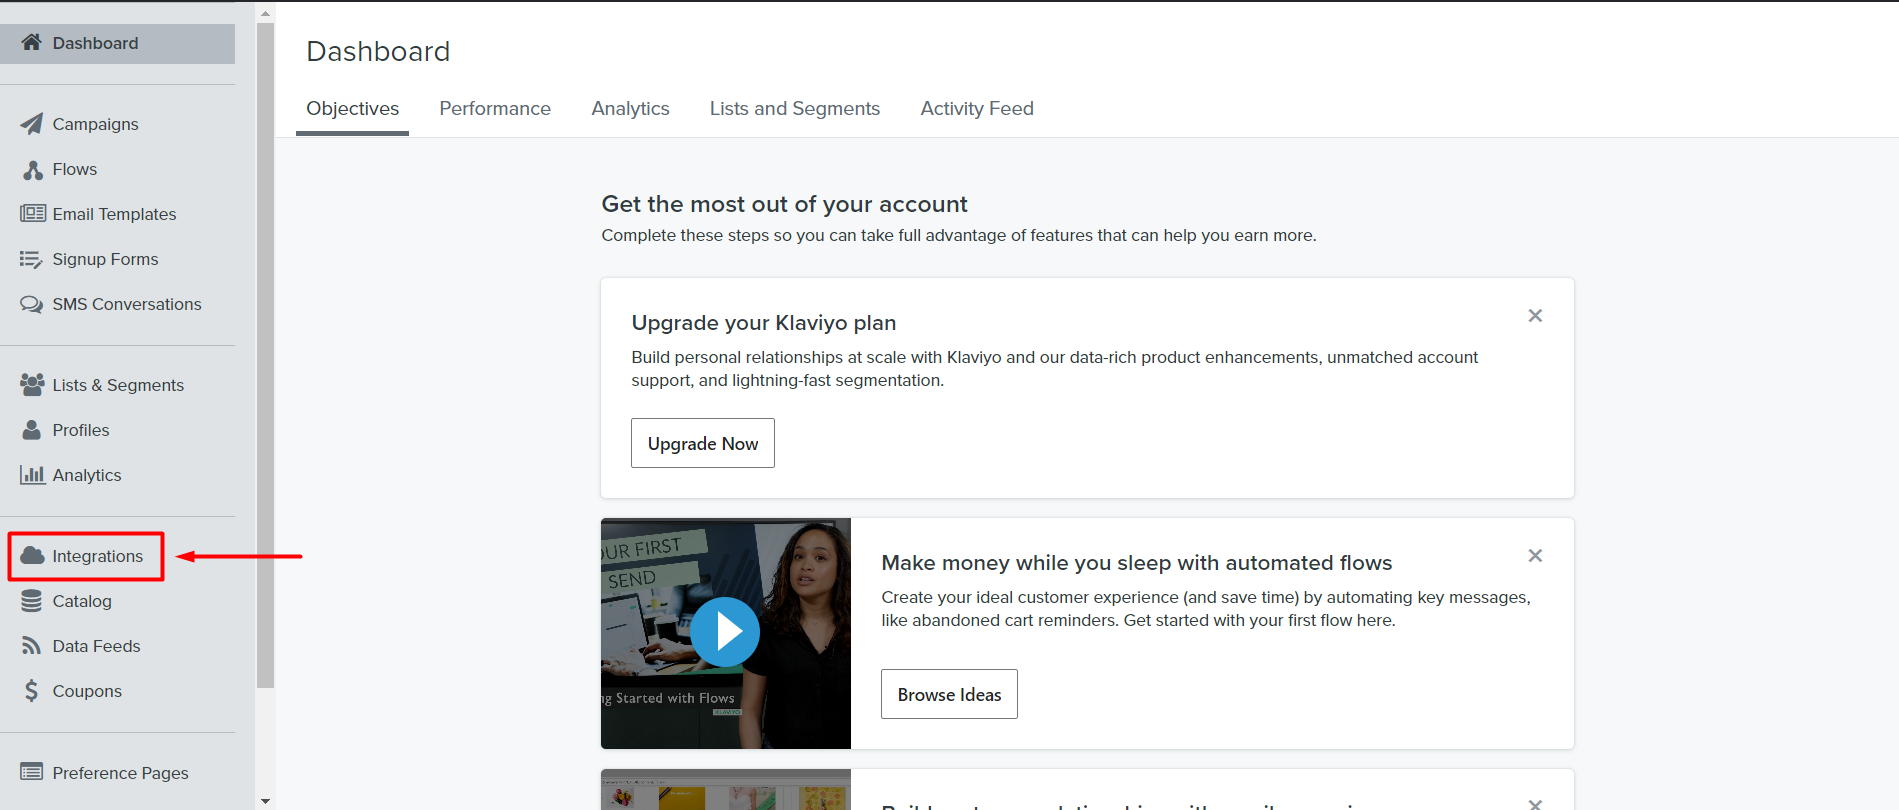
Step 1 - Sign In to Klaviyo
Sign in to your Klaviyo account and click on Integrations in the left menu.
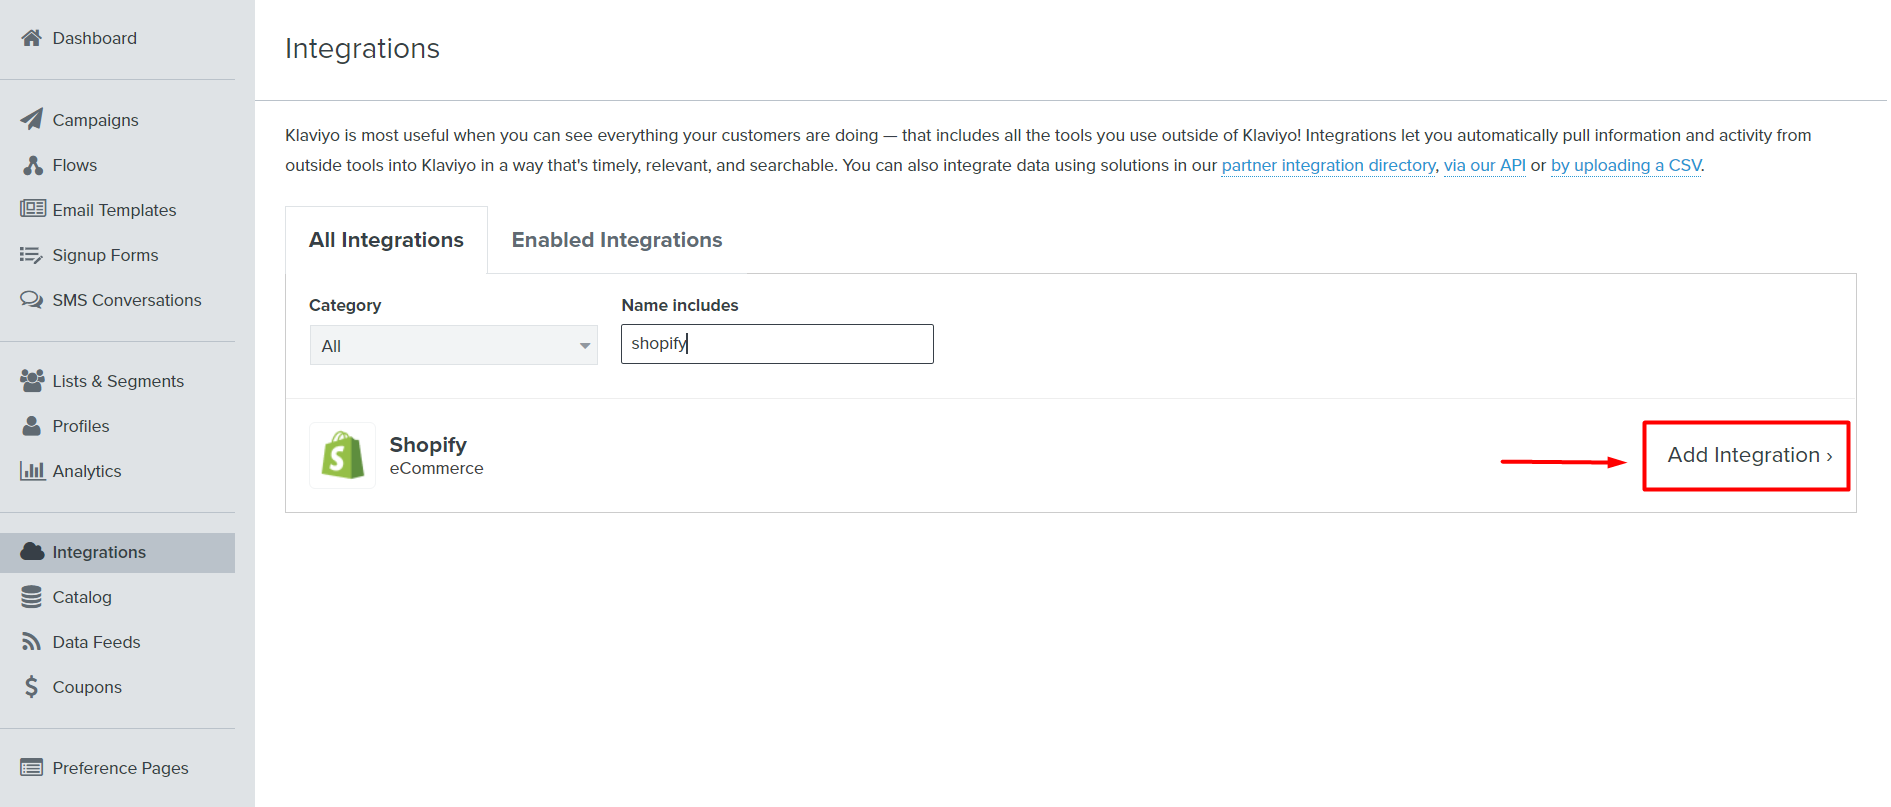
Step 2 - Add the Shopify Integration
This will bring you to the Integrations page listing all available integrations. Search for the Shopify Integration. Once you find it, click on Add Integration.
Step 3 - Configure Settings
You should now be on the Shopify integration settings page in Klaviyo. Here, you can configure your Shopify settings before connecting your account. Let's walk through each of these settings individually.
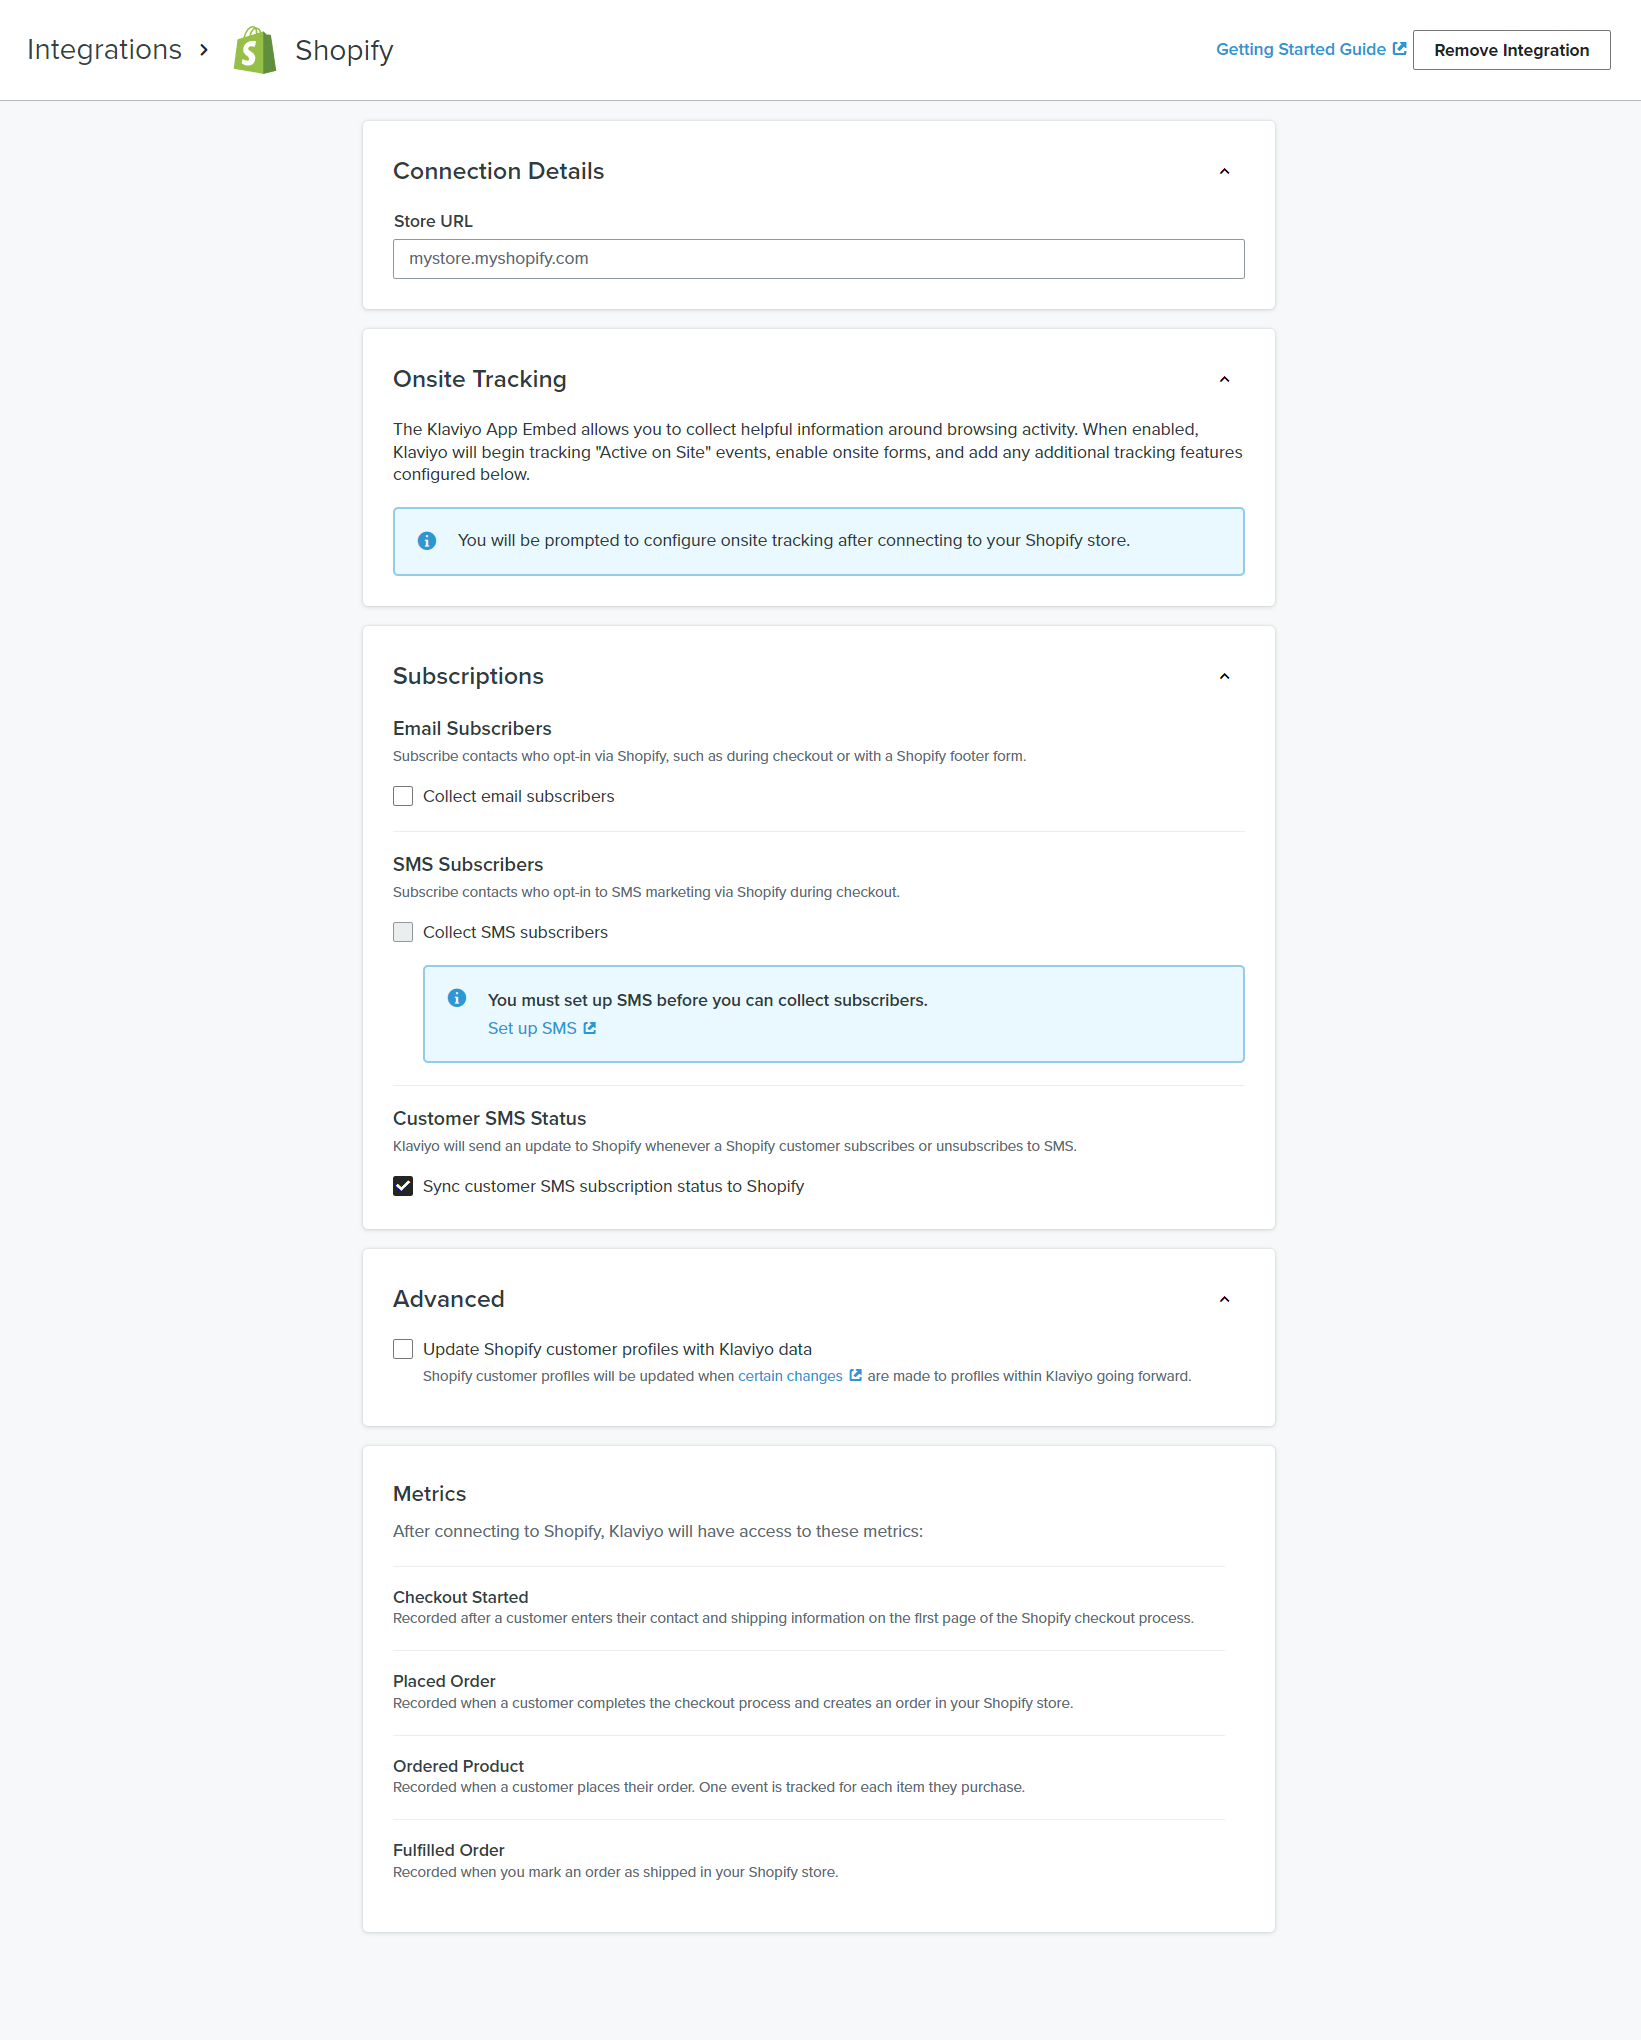
Store URL
In this field, enter the URL of your Shopify store. This should be your myshopify.com domain in the format of
mystore.myshopify.com.
Onsite Tracking
Onsite tracking helps you track and engage with identifiable customers who browse your Shopify store. There are two types of onsite tracking supported by Klaviyo:
- Active on Site: This event fires whenever an identifiable customer visits your store and can help you segment your customers based on engagement level. Enabling this also allows you to use Klaviyo signup forms.
- Viewed Product: This event fires whenever an identifiable customer views a product page on your store. You can use this event to engage with customers interested in specific products. For example, you can use it to send reminders to customers who browse a product but don't purchase it.
We will enable onsite tracking later in this guide.
Email Subscribers
Check the Collect email subscribers box to automatically add Shopify email subscribers to the Klaviyo list you choose from the dropdown. When a customer who accepts email marketing completes a purchase or signs up to your default Shopify signup form, they will automatically be added to your Klaviyo list. This will save you time and help you quickly build a list of consented email subscribers to market to within Klaviyo.
SMS Subscribers
Check the Collect SMS subscribers box to automatically add all customers who accept SMS marketing at checkout to the Klaviyo list you choose from the dropdown. Collecting SMS consent from customers during checkout is a non-intrusive way to grow your SMS subscriber list. It's important to note that you will only be able to collect SMS consent from customers in countries where Klaviyo SMS is available.
NOTE: If you are collecting email and SMS subscribers, assigning a separate list to each channel is helpful. This ensures consent for each channel syncs correctly between Shopify and Klaviyo.
Customer SMS Status
The Sync Customer SMS Subscription Status to Shopify setting isn't required, but we recommend checking the box. This automatically syncs your SMS subscription data from Klaviyo to Shopify and updates whenever a customer subscribes or unsubscribes to SMS messages.
Update Shopify Customer Profiles with Klaviyo Data
This option syncs specific fields from Klaviyo to Shopify, like first name, last name, email marketing, and more. Only check this box if you want the Klaviyo values to overwrite the values in Shopify.
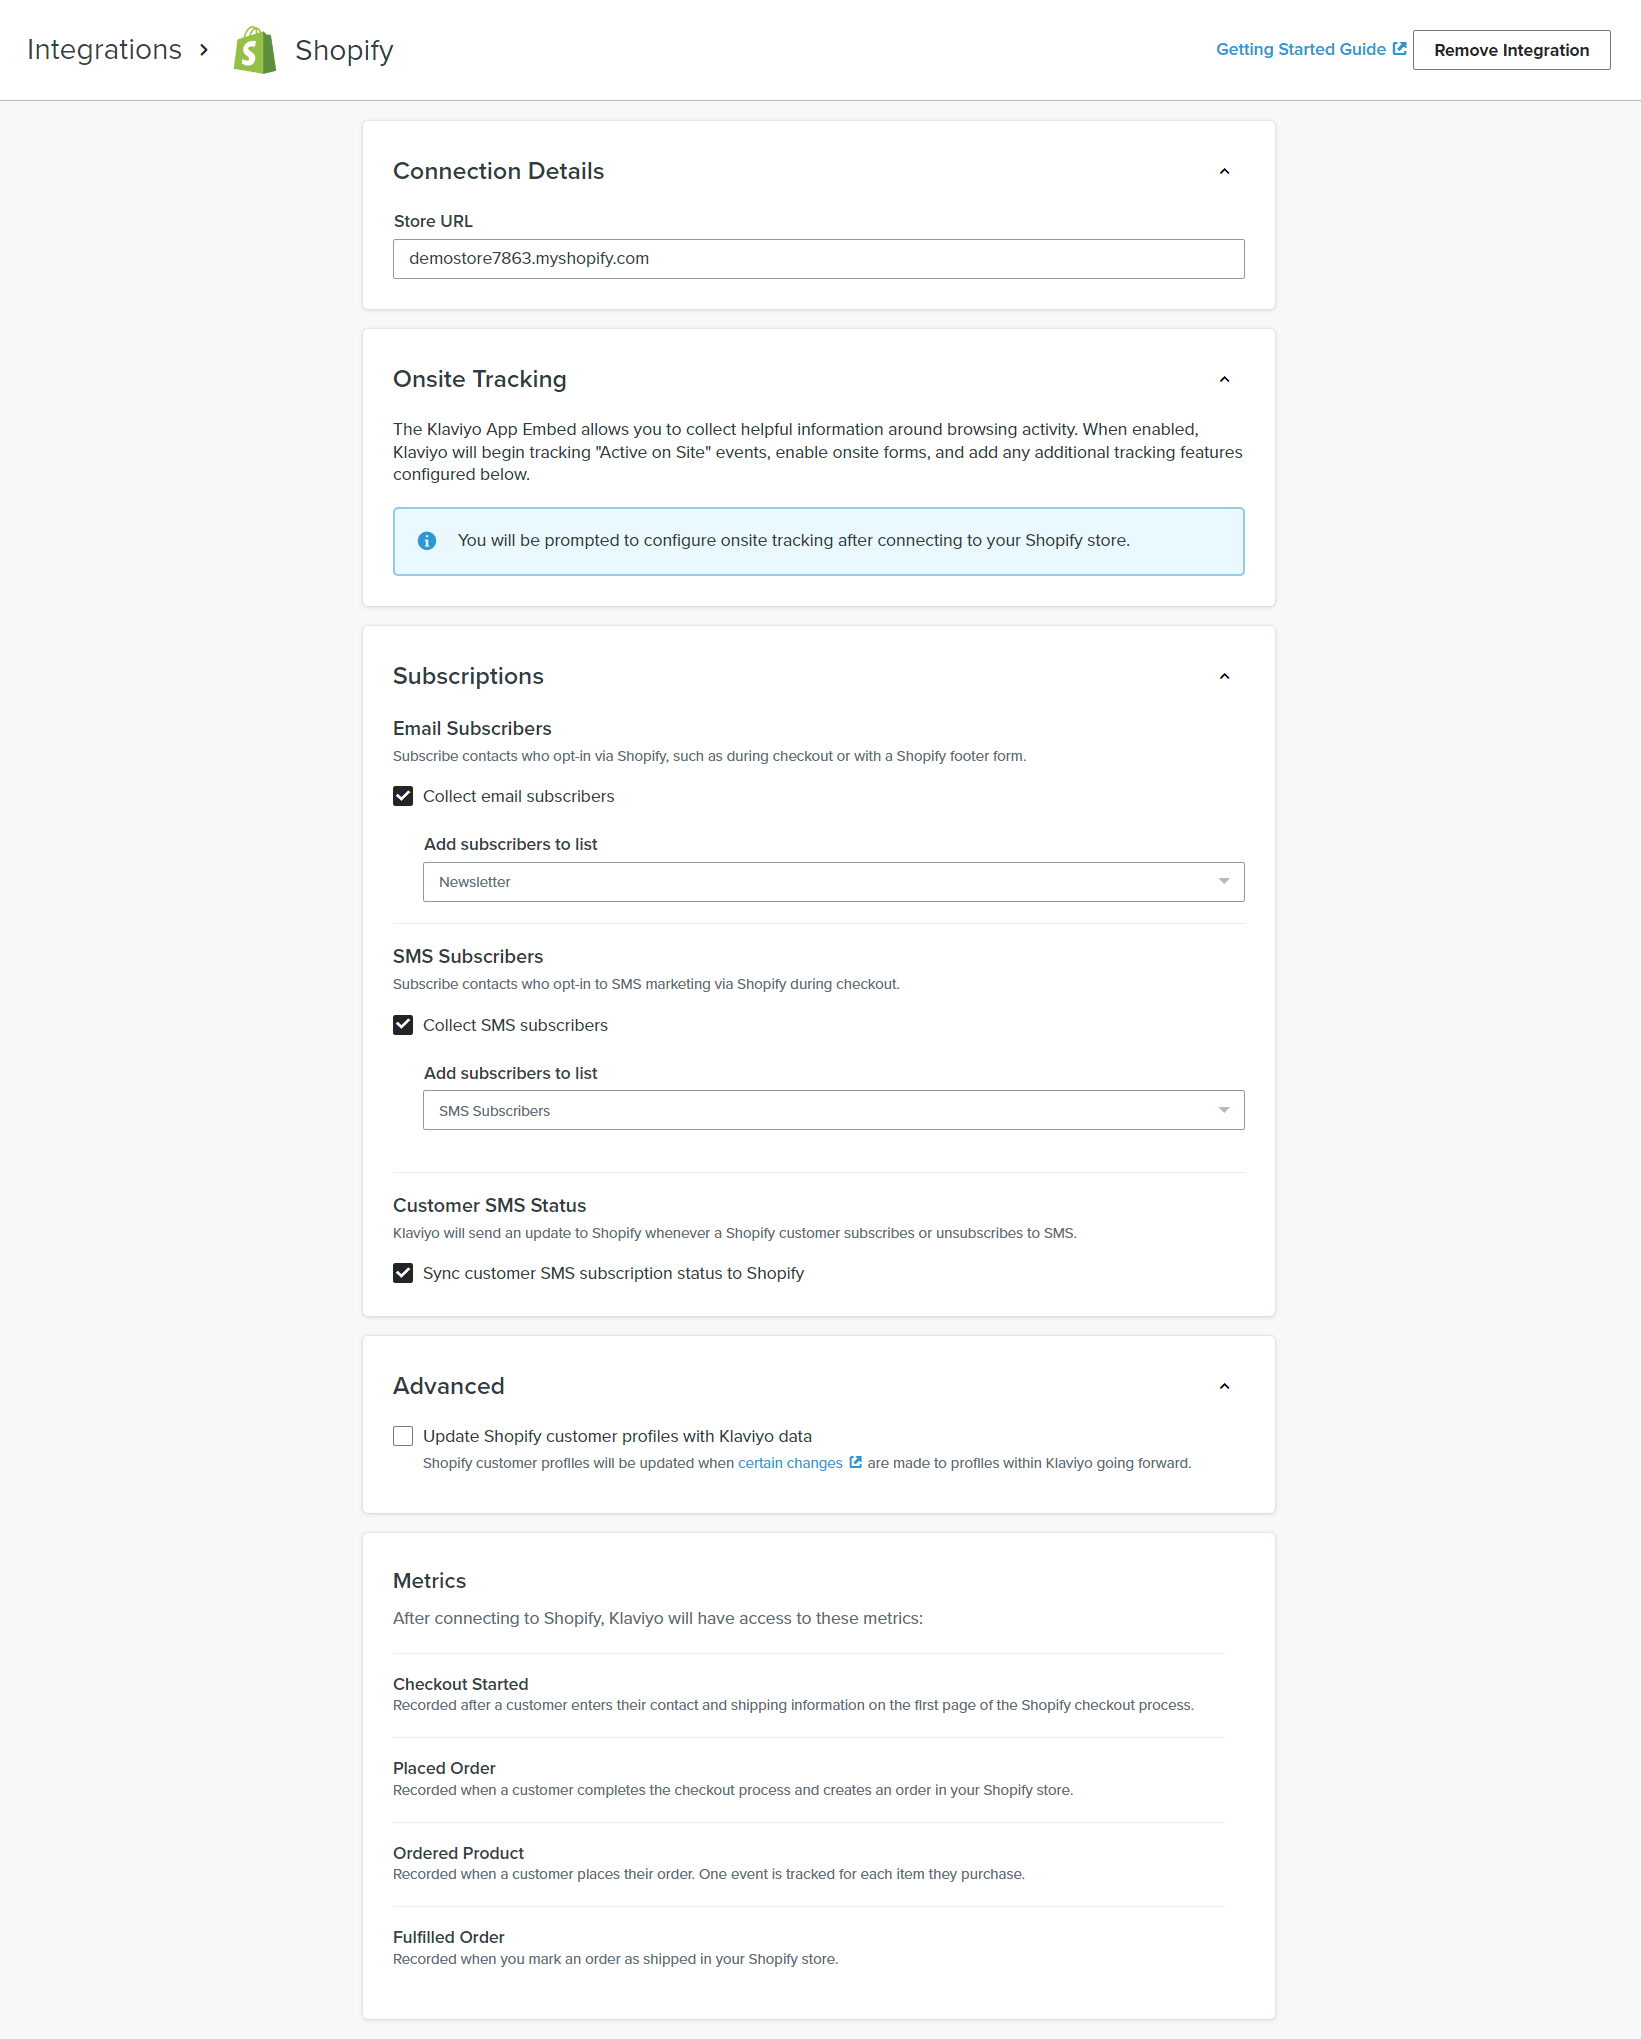
Once you finish configuring your settings, click Connect to Shopify. If all goes well, this should take you to your Shopify account.
NOTE: If you ever need to update these settings, you can come back to this page, make the changes, and then click Update Settings. Your changes will go into effect immediately.
Step 4 - Install the Klaviyo Shopify App
You should now be in Shopify and see a prompt to install the Klaviyo App in Shopify. Review the permissions and click the green Install app button.
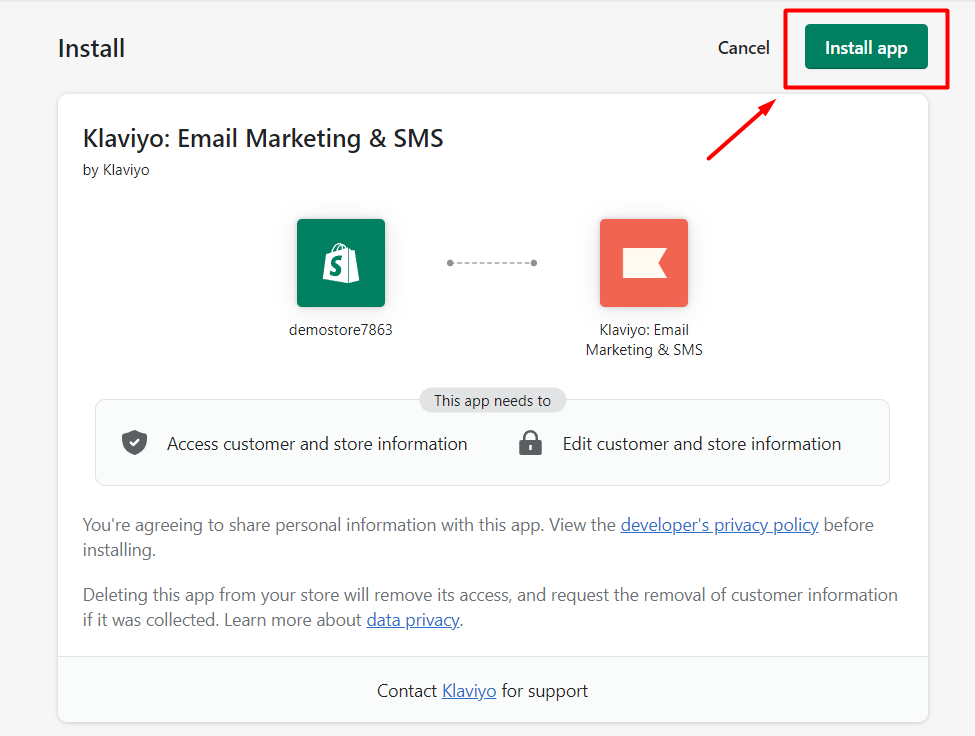
This will take you back to your Klaviyo account and kick off the process of syncing your Shopify data with Klaviyo. How long the sync takes will depend on the amount of data you have in Shopify.
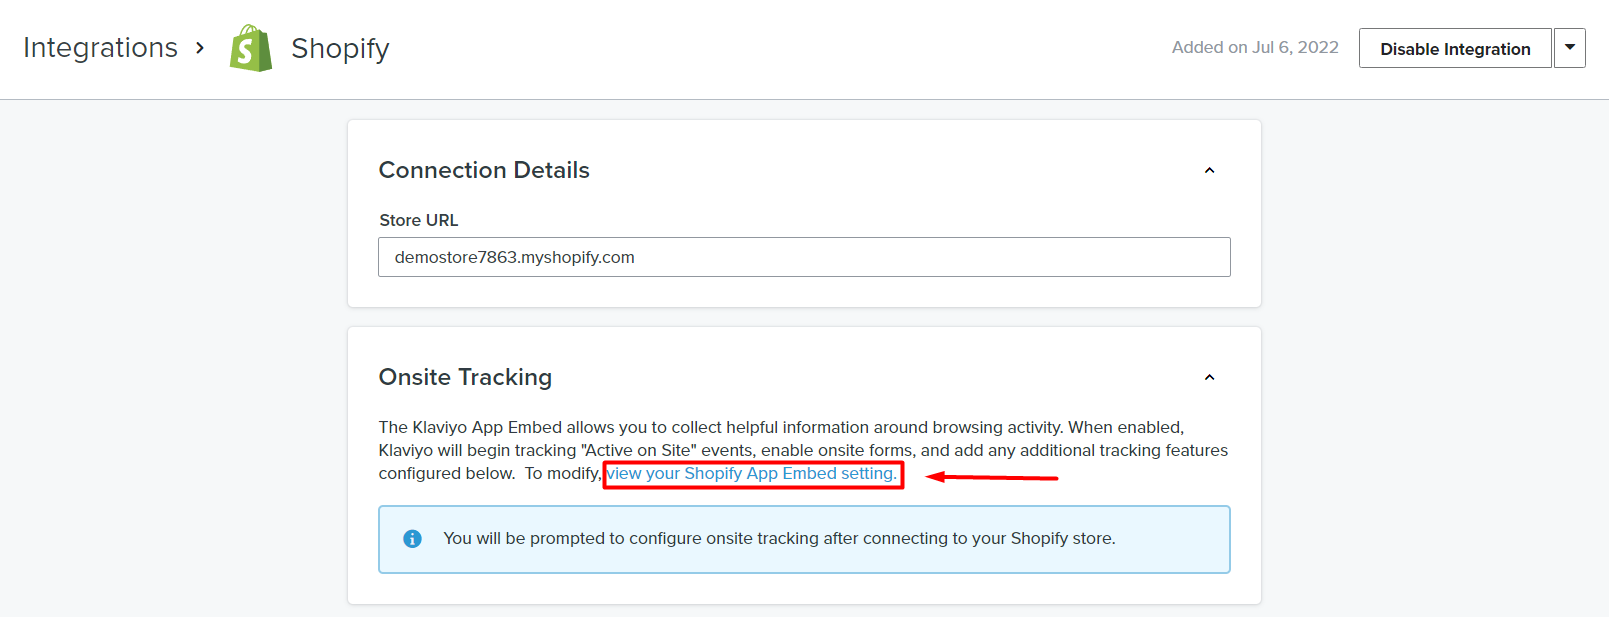
Step 5 - Enable Onsite Tracking
The final step is to enable onsite tracking by toggling on the Klaviyo app embed within Shopify.
Navigate back to the integration settings page in Klaviyo. You should see a message stating that your Klaviyo app embed isn't enabled yet.
Click the View your Shopify App Embed setting link to be brought back into Shopify.
You should now be in your Shopify theme settings. Toggle the app embed on and then click Save.
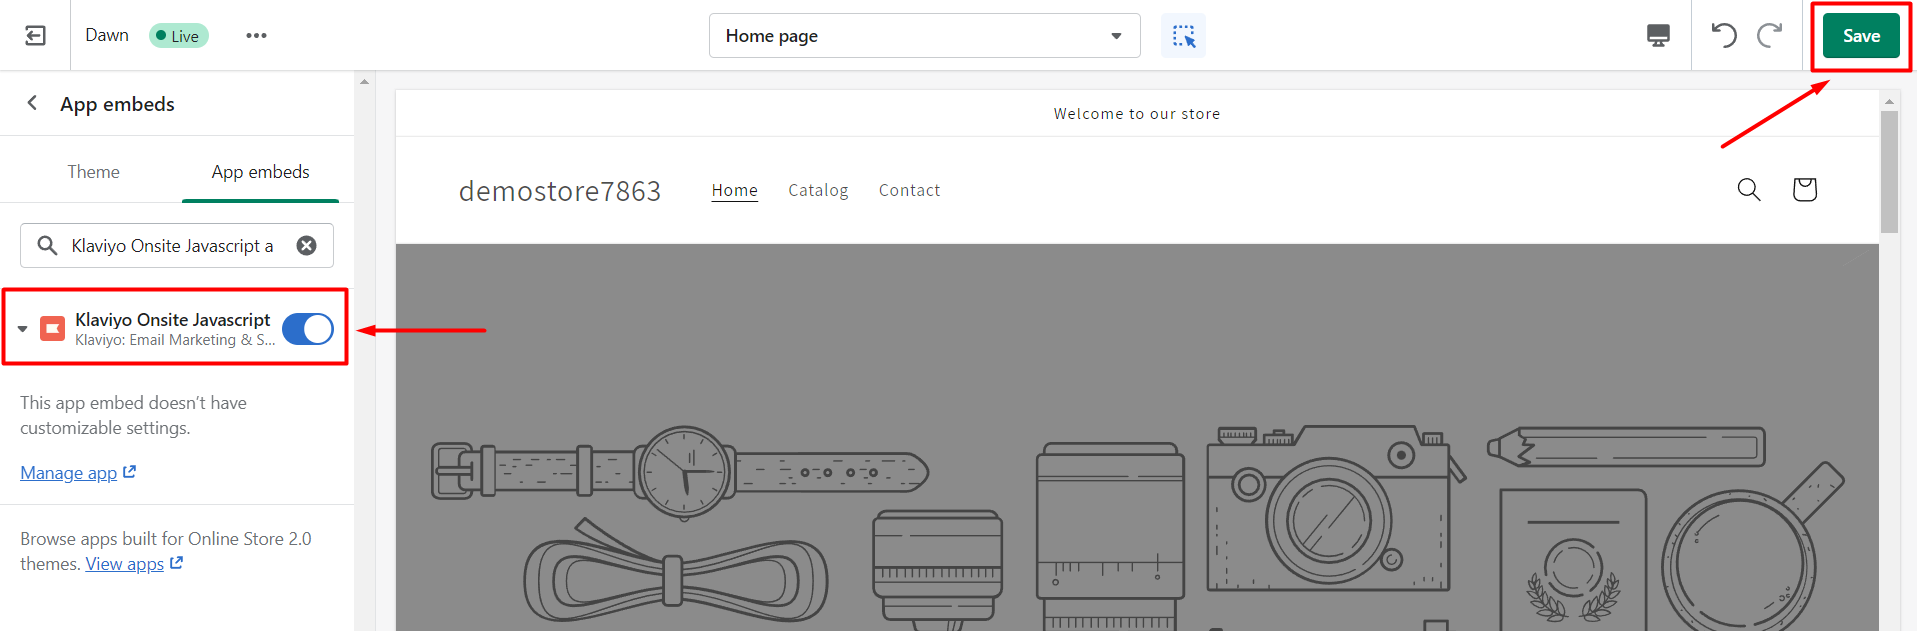
The app embed is now enabled.
Final Thoughts
If you followed the steps in this article, your Klaviyo account should now be integrated with your Shopify store. You're ready to create email and SMS flows triggered by customer behaviors in Shopify!
